Showing posts with label ABAP Programming. Show all posts

How to incorporate and print several SMARTFORMS in one SPOOL request?

Printing several forms in one spool request


We will see how printed multiple forms may be included in a single spool
request. We will create a number of form pages comprising employees data. Each page
will contain one employee's salary information. The recipe will focus on the important
parts of the program related to Smart Form processing. We assume that an internal table
EMPLOYEE_LIST exists that contain the employee numbers of all personnel to be processed.


1. First, we call the function module SSF_FUNCTION_MODULE_NAME in order to get the
name of the Smart Form function module. The form name is passed to the function
module. The myfunction variable is based on the type RS38l_FNAM (not shown in
the following screenshot):


2. Then appropriate variables are defined for the Smart Form control structure and
output options based on dictionary structures.


3. The function module SSF_OPEN is then called.


4. A loop is run on the internal table employee_list for all employees. For each
employee, the form get_employee_data is called, which fetches the necessary
information of the employee in question and fills the internal table employee_data.
The no_open and no_close fields of the control parameters structure are assigned
the value 'X'. In addition, the tdnewid field of the output options structure is
assigned 'X'.


5. The function module of the Smart Form is then called and necessary data of the
employee provided along with control parameters and output option structures.


6. Finally, the SSF_CLOSE function module is called.

After executing the program, multiple pages of the forms are generated. For each employee,
a separate page appears along with the necessary information.


The call of the function module SSF_OPEN opens the spool job for form printing.
The tdnewid assigned to 'X' creates a new spool request. Within the loop, the no_open
and no_close fields are set to 'X', which ensures the spool request is not opened or closed
within the loop. The function module of the Smart Form is called in the loop and generates
the necessary output of each employee. When all employees are processed, the SSF_CLOSE
function module is called and the spool request is closed.


We can also avoid the usage of the SSF_OPEN and SSF_CLOSE function modules. In this
case, when we program that on the first employee, the spool job is opened and when we
program that on the last employee, the spool job is closed.

How to set image as a background in the SMARTFORMS?

Setting background pictures in FORMS and in the print preview


We will first create a background image and upload the image on the SAP Document Server
using the transaction SE78. The name of the image we upload is ZST9_BACKGROUND and is
in color (the supported formats are .tiff and .bmp).


We will now set the graphic as the form background. Follow these steps:
1. Call the transaction SMARTFORMS. Double-click the relevant node in the left-hand
pane of the page for which the background image is to be set.
2. In the right-hand pane, three tabs will appear for the page. The third is Background
Picture. On this tab, enter the name of the uploaded graphic. Select the Color
Bitmap Image (BCOL) radio button. Within the Output Mode list, select Print
Preview from the listbox.


3. The main window is placed on top of the background graphic.


4. Next, we define a text within the MAIN Main Window on the page.


5. A suitable line TEST TEXT FOR BACKGROUND is created within the created text,
as shown in the following screenshot:


When the Smart Form is called (using a calling program), the background graphic is displayed
along with the line of text in the Print Preview mode. However, when the form is printed, no
background image appears (only the line of text created appears). This setting is very useful
when a pre-printed paper having the appropriate background graphic is used for printing, and
should not be printed in the form output (since the paper already has the graphic in it). The user,
however, needs to see the background graphic when the form preview is taken on the screen.


If the background graphic appears blurred or the pixel artefacts are visible, we may need to
use a high-resolution graphic. One option may be that we use a high quality (high-resolution
graphic). Also, we may try to control this using the resolution setting through the Resolution
field in the Output Attributes screen. Instead of keeping it blank, we may enter a value of
200. The higher the resolution, the clearer will be the graphic (however, the size of the
graphic may decrease as the resolution increases).
We may also slightly change the image's output mode in order to make the image work as a
watermark when printed on paper. Instead of the Print preview and no print option for the
Output Mode, we can choose the Print preview and print option.


This will print the image on both the Print option (and the Print Preview option) and when
printed on paper, it will make the image appear as a watermark on top of which text and data
will appear.


How to find problem area in ABAP Programming?

Using transaction SAT to find problem areas

we will see the steps needed to investigate the execution of any report,
transaction, or operate module using the transaction SAT.


we will analyze the runtime of a standard program RIBELF00. We will execute the program on the order number (aufnr) and see the behavior.

For carrying out runtime analysis using transaction SAT, proceed as follows:

1. Call transaction SAT. The screen appears as shown:


2. Enter a suitable name for the variant (in our case, YPERF_VARIANT) and click the Create button below it. This will take you to the Variant creation screen.


3. On the Duration and Type tab, switch on Aggregation by choosing the Per Call
Position radio-button.

4. Then, click on the Statements tab. On the Statements tab, make sure Internal
Tables, the Read Operations checkbox and the Change Operations checkbox,
and the Open SQL checkbox under Database Access are checked.


5. Save your variant. Come back to the main screen of SAT.

6. Make sure that within Data Formatting on the initial screen of SAT, the checkbox for
Determine Names of Internal Tables is selected.

7. Next, enter the name of the program that is to be traced in the field provided (in our
case, it is RIBELF00). Then click the button.

8. The screen of the program appears as shown. We will enter an order number range
and execute the program.

9. Once the program output is generated, click on the Back key to come back to
program selection screen.

10. Click on the Back key once again to generate the evaluation results.


We carried out the execution of the program through the transaction SAT and the evaluation
results were generated. On the left are the Trace Results (in tree form) listing the statements/
events with the most runtime. These are like a summary report of the entire measurement
of the program. They are listed in descending order of the Net time in microseconds and the
percentage of the total time. For example, in our case, the OPEN CURSOR event takes 68
percent of the total runtime of the program.


Selecting the Hit List tab will show the top time consumer components of the program. In this
example, the access of database tables AFRU and VBAK takes most of the time.


Double-clicking any item in the Trace Results window on the left-hand side will display (in the
Hit List area on the right-hand pane) details of contained items along with execution time
of each item. From the Hit List window, double-clicking a particular item will take us to the
relevant line in the program code. For example, when we double-click the Open Cursor VBAK
line, it will take us to the corresponding program code.


We have carried out analysis with Aggregation switched on. The switching on of Aggregation
shows one single entry for a multiple calls of a particular line of code. Because of this, the
results are less detailed and easier to read, since the hit list and the call hierarchy in the
results are much more simplified.
Also within the results, by default, the names of the internal table used are not shown.
In order for the internal table names to appear in the evaluation result, the Determine
Names checkbox of Internal tables indicator is checked.
As a general recommendation, the runtime analysis should be carried out several times for
best results. The reason being that the DB-measurement time could be dependent on a
variety of factors, such as system load, network performance, and so on.

How to hide a Parameter in Selection Screen?


How to show and hide the Parameters in Selection Screen through ABAP Programming?


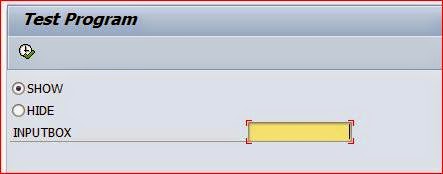
Initialize a Radio Button for showing the parameter and a radio button to hiding the parameter.
A Parameter field in the selection screen.


The changes and radio button behaviors are done in the AT SELECTION-SCREEN OUTPUT event.

The screen is modified using the below codes and enabling and disabling is done using setting 0 or 1 for the screen field screen-active.

MODIF ID ‘MOD’ is used to access the parameter ‘inputbox’ in the selection screen.


Output when selecting ‘SHOW’ Option


Output when selecting ‘HIDE’ option


Adding TABSTRIP in ABAP Selection Screen - SAP


How to add Tabstrips in Selection Screen using ABAP programming?

SAP ABAP Programming


Define a selection screen 100 as the subscreen. Within the subscreen, define a parameter according to your requirement.


Define a selection screen 101 as the subscreen. Within the subscreen, define a parameter according to your requirement.


Now assign the Tabs to the subscreen 100 and 101.


Name the Tabstrips as per your requirement.


Press F8 to execute the program and you will see the result as below.