How to find problem area in ABAP Programming?

Using transaction SAT to find problem areas

we will see the steps needed to investigate the execution of any report,
transaction, or operate module using the transaction SAT.


we will analyze the runtime of a standard program RIBELF00. We will execute the program on the order number (aufnr) and see the behavior.

For carrying out runtime analysis using transaction SAT, proceed as follows:

1. Call transaction SAT. The screen appears as shown:


2. Enter a suitable name for the variant (in our case, YPERF_VARIANT) and click the Create button below it. This will take you to the Variant creation screen.


3. On the Duration and Type tab, switch on Aggregation by choosing the Per Call
Position radio-button.

4. Then, click on the Statements tab. On the Statements tab, make sure Internal
Tables, the Read Operations checkbox and the Change Operations checkbox,
and the Open SQL checkbox under Database Access are checked.


5. Save your variant. Come back to the main screen of SAT.

6. Make sure that within Data Formatting on the initial screen of SAT, the checkbox for
Determine Names of Internal Tables is selected.

7. Next, enter the name of the program that is to be traced in the field provided (in our
case, it is RIBELF00). Then click the button.

8. The screen of the program appears as shown. We will enter an order number range
and execute the program.

9. Once the program output is generated, click on the Back key to come back to
program selection screen.

10. Click on the Back key once again to generate the evaluation results.


We carried out the execution of the program through the transaction SAT and the evaluation
results were generated. On the left are the Trace Results (in tree form) listing the statements/
events with the most runtime. These are like a summary report of the entire measurement
of the program. They are listed in descending order of the Net time in microseconds and the
percentage of the total time. For example, in our case, the OPEN CURSOR event takes 68
percent of the total runtime of the program.


Selecting the Hit List tab will show the top time consumer components of the program. In this
example, the access of database tables AFRU and VBAK takes most of the time.


Double-clicking any item in the Trace Results window on the left-hand side will display (in the
Hit List area on the right-hand pane) details of contained items along with execution time
of each item. From the Hit List window, double-clicking a particular item will take us to the
relevant line in the program code. For example, when we double-click the Open Cursor VBAK
line, it will take us to the corresponding program code.


We have carried out analysis with Aggregation switched on. The switching on of Aggregation
shows one single entry for a multiple calls of a particular line of code. Because of this, the
results are less detailed and easier to read, since the hit list and the call hierarchy in the
results are much more simplified.
Also within the results, by default, the names of the internal table used are not shown.
In order for the internal table names to appear in the evaluation result, the Determine
Names checkbox of Internal tables indicator is checked.
As a general recommendation, the runtime analysis should be carried out several times for
best results. The reason being that the DB-measurement time could be dependent on a
variety of factors, such as system load, network performance, and so on.

How to create a persistent objects in SAP?

Creating a persistent object

ABAP objects provide a persistent object service that allows the developer to store objects in
the database. 

The values of the attributes of the object are stored in appropriate fields of the
database table specified.

Prior to storing objects in the database, a suitable database table with the name
ZEMP_TABLE is created to store the values of the objects' attributes. 

Two fields are defined, NUMBER1 and NAME (the field name NUMBER was not allowed, so NUMBER1 has been used as the field name). Refer to the following screenshot:


Once the database table is defined, a persistence class must be defined. 
In order to define persistent classes, follow these steps:

Call transaction SE24. Enter a suitable name of the persistent class to be created.

We will create a class by entering the name ZCL_MY_PERSIST. 
Enter the name in the Class field and click on the Create button.


Enter a suitable description in the field provided. Make sure that the Persistent Class
indicator is selected, and click on Save.


The programmer may only modify the methods HANDLE_EXCEPTION and INIT.


Click on the Persistence button. 

Then, enter the name of the table that was created for storage of data( in our case, we will enter the name ZEMP_TABLE). Refer to the following screenshot:


This will take you to the mapping editor. 

The lower part of the screen will show Table/Fields. 

Double-click each of the field that is to be included and stored as attributes of the persistent class. 

The selected field appears in the area earlier (for example, the NUMBER1 field as shown in the following screenshot). 

Click on the Set attribute values button to include the field.


This will transfer the selected field in the topmost area of the editor.

Similarly, the NAME field must be included.


All the mapped fields will appear at the top area of the mapper. 

The Number1 field will appear as a business key, as show in the following screenshot:


Upon activation of the persistence class, the system asks for activation of the actor class as well. 

Click on Yes, as shown in the following screenshot:


The class ZCL_MY_PERSIST is created and necessary methods needed for the persistence service are included. An actor class is also created with the class. 


The agent class has been generated by the name ZCA_MY_PERSIST. 

There is one base agent class generated as a result. In total, three classes are generated, the persistent class, the agent class, and the base class of the agent.


The class ZCL_MY_PERSIST contains methods for setting and getting the values of the attributes NAME and NUMBER1. 

Note that no SET method is generated for the key field, in our case NUMBER1.


The agent class provides number of useful methods related to the persistent property. Important methods, such as create_persistent, delete_persistant, and get_persistent are provided. 

The methods are implemented in the superclass zcb_my_persist of the agent class zca_my_persist.


During the generation of the persistent class zcl_my_persist, two additional classes are generated. 

These are the actor (agent) and the base agent classes having the names zca_my_persist and zcb_my_persist respectively.  

The base agent class is generated as abstract (that is, no instance can be constructed from it), and cannot be modified. 

It is created in a separate pool class from zcl_my_persist. 

The agent class zca_my_persist may be extended, as well as the loading and saving methods may be modified.


The instantiation mode of the persistence class may be set as abstract or protected. 

In our recipe, we have chosen the instantiation mode as protected (which means that only instances
may be created from within the class or its subclasses). 

However, making the instantiation mode of a persistent class as protected makes the generated base agent class a friend of the persistent class (in the world of ABAP objects, a friend or its subclasses may create instances of the class in question).


The coding for this recipe declares two references, emp and agent, to the persistent class zcl_my_persist and the agent class zca_my_persist, respectively. 

Next, the static factory method agent is called for the class zca_my_persist (agent class). 

The reference returned is stored in the variable agent. The agent class contains the method create_persistent required for storing the data into the database (this is analogous to the concept of insertion in database table).  

The most important part is the calling of the create_persistent method that is passed the number and name that is to be stored. 

The employee with the number 00000017 and name John Reed is created and reference is returned in emp.

One row with the number and a name is added to the table ZEMP_TABLE.


For reading the stored value related to the employee number 00000017, a number variable is declared and assigned the value 00000017. The static method agent of the zca_my_persist class is called in order to get a reference to the agent. 


The get_persistent method is then called and the number (in our case, 00000017)
is passed. 

This method returns the entire object emp pertaining to the employee number. 

You may then call the get_name method of the zcl_my_persist class for the emp object in order to retrieve the employee name.


How to create class based on Factory Method?

Creating classes based on factory methods


Create a class definition for fac_meth_class in the program. 

The factory method is a static method for the class and is defined via CLASS-METHODS.

The class definition contains the addition create private in order to stop the instantiation of the class from outside via CREATE OBJECT. 

A constructor is defined that allows setting the value of the number and the employee name.


The private attributes employee number and name are defined, as it is based on the dictionary data 

elements persno and smnam respectively.


The static method factory imports the name and number of the employee to be created and returns the  
employee object employee_obj of the object reference fac_meth_class. 

The constructor takes as input the number and the employee name.


The implementation of the fac_meth_class object reference is then created. 

The code for the factory and the constructor is written here. 

The factory method receives the number and the name of the employee to be created. 

It includes the CREATE OBJECT statement for creation of the employee object.


The constructor assigns the number and employee name to the corresponding
private attributes of the newly constructed object. 

A WRITE statement is also included that outputs the name and number of the successful created employee.


Finally, the call for the factory method is included. The static method of the
fac_meth_class=>factory object is included and passed with the number and
name of the employee to be created. A code shows two such method calls for object
references emp1 and emp2, that is, employee 00000012 and 0000014.


When the program calls the static factory method, the code within the factory method
is called for each of the two objects emp1 and emp2. The factory method triggers CREATE
OBJECT statement, which creates a new object and calls the constructor.
The constructor is called twice, once for each of the two instantiated objects emp1 and emp2.
This prints the message successful creation for emp1 and emp2.


How to use the performance using Hashed Table?


Hashed table for single read access


Hashed table is used to access the internal table in a constant time. It increase the performance for reading the internal table.


We define select-options for taking input of personnel number.


Next, we define a type ty_payroll based on payroll infotype fields pernr and abrdt. 

A structure and a hashed table based on this type are also defined. 

The hashed table has a unique key pernr.


Similarly, an address type ty_address is defined, along with a structure and internal table.


We then write two select statements. 

The first reads PA0003 for all personnel numbers specified and the date of last payroll run (abrdt). 

The second select statement is used to read all the stras addresses corresponding to permanent
address type (subty = 1) valid at the system date.


Finally, a loop is run on the addresses internal table it_address. 

Within the loop, the read table statement is used for reading the payroll table it_payroll
(the hashed table) for each of the personnel number processed. 

Within the loop, the personnel number, abrdt date, and the address field stras are displayed.

We have used field symbols instead of work areas, in conjunction with loop and read statements for better performance.


How to create Secondary Indexes for Internal Tables?


Introduction to the new concept of secondary keys/index within internal tables.


We first declare a type ty_vbak based on the database table vbak. 

We create two keys for this table type. 

The first is a non-unique primary key having vbeln as the key field. 

We also create a non-unique sorted secondary key sec_key having one field aufnr. 

An internal table it_vbak is defined based on the type ty_vbak. 

In addition, a work area wa_vbak is declared for the table it_vbak.

 It is always better in terms of performance to use field symbols rather than work areas. 

In this example, for simplicity's sake and since the performance gain is minimal, work areas have

been used.


Next, all records from table vbak are read into table it_vbak.


Then, the read table statement is used to read the row of internal table it_vbak pertaining to aufnr 

503002 using the secondary key sec_key.


In the table type definition, we specified a non-unique sorted secondary key (based on aufnr)

along with the primary key. 

For the read statement, we also specify that the secondary key sec_key is to be used when searching in internal table it_vbak the row corresponding to aufnr 503002. 


Since the secondary key is used, the aufnr field is first searched in the secondary index sec_key. 

A faster binary search is used since it is a sorted index. 

The row number of the actual internal table it_vbak containing the aufnr 503002 field is then
determined. 

Once this number is known, the relevant row is read and values assigned to the structure wa_vbak. 

The vbeln field is then printed. 

Had no secondary index been specified, a sequential search through the internal table it_vbak would have been used, which was very time consuming.


How to create Shared Memory in SAP?

Creating Shared Memory

Call transaction SE24; enter a suitable name to your root class, as shown in the following screenshot. 

On the Properties tab, we need to make sure that the Shared-Memory checkbox is switched on.


We have named it ZCL_MY_ROOT. We will then define two Instance Attributes,

NUMBER and NAME, having private visibility, as shown in the following screenshot:


Two suitable methods, SET_DATA and GET_DATA, are also added to the class. 

The SET_DATA method contains code that imports number and name and assigns to the attributes 

NUMBER and NAME of the class. The GET_DATA method does just the opposite, that is, it 

exports the NUMBER and NAME attribute for a given shared memory object.

Next, the shared memory area should be created. 

This is done via transaction SHMA.

Enter a suitable name and click on the Create button. 

We have typed the name ZCL_MY_EMP_AREA. On the screen that appears, enter the description 

of the area. Also, enter the name of the root class created earlier in the Root Class field. 

You may leave the Client-Specific Area checkbox unchecked as it is not required for our recipe. 

Now, save your entries. Refer to the following screenshot:


This will also generate an area class by entering the same name ZCL_MY_EMP_AREA.


This area class will contain the necessary methods used for reading, changing, and creating the area, 

such as ATTACH_FOR_UPDATE, ATTACH_FOR_READ, and ATTACH_FOR_WRITE.


For creating the set of code that writes object's contents to the shared memory, follow these steps:

1. Two object references my_handle and my_root are defined, one for area class and the other for root class.

2. The static method attach_for_write of the area class zcl_my_emp_area is called.

3. The CREATE OBJECT with the area handle, my_handle must then be called.

4. The root and the created area instance must be linked using the set_root method of the handle.

5. The set_data method is called with the relevant number and name.

6. The detach_commit method of the area class is then called.


The read program is somewhat similar. However, instead of the attach_for_write method used 

earlier, we will use attach_for_read. 

The same instance name is passed and the handle is received. 

The method imposes a read lock on the area instance. Then, the get_data method of the root object is 

called using the area handle, my_handle. This returns the employee name and number stored earlier 

into the variables name and number respectively.

Finally, the detach method is called and the read lock is released.


While creating the shared memory area, if we select the Transactional Area checkbox, the area 

becomes transactional. In this case, the modifications to the area instance versions are not active 

immediately after the call of detach_commit method. Rather, they become active when the next 

database commit is executed.


How to Enable the Microsoft word text editor in SAP Script and SAP SMARTFORMS?

Enabling MS Word Editor for SAP Script and SMARTFORMS?


Execute the program RSCPSETEDITOR.


You will see the selection screen with the option to enable the editor.


Check the checkbox as per your requirement for SAP Script or SAP SMARTFORMS.


You can also select ‘Multi-Character Format Support’ if you want to use the hided text in the multi-character formats during ITF to RTF Conversion.


How to hide a Parameter in Selection Screen?


How to show and hide the Parameters in Selection Screen through ABAP Programming?


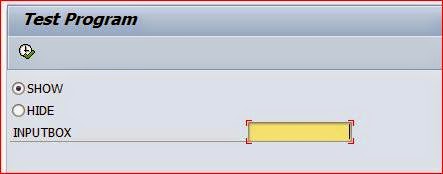
Initialize a Radio Button for showing the parameter and a radio button to hiding the parameter.
A Parameter field in the selection screen.


The changes and radio button behaviors are done in the AT SELECTION-SCREEN OUTPUT event.

The screen is modified using the below codes and enabling and disabling is done using setting 0 or 1 for the screen field screen-active.

MODIF ID ‘MOD’ is used to access the parameter ‘inputbox’ in the selection screen.


Output when selecting ‘SHOW’ Option


Output when selecting ‘HIDE’ option


How to enable and disable a parameter in the selection screen?


Enabling and disabling Parameters based on radio button selection - SAP ABAP

Initialize a Radio Button for enabling the parameter and a radio button to disable the parameter.

A Parameter field in the selection screen.


The changes and radio button behaviors are done in the AT SELECTION-SCREEN OUTPUT event.
The screen is modified using the below codes and enabling and disabling is done using setting 0 or 1 for the screen field screen-input.
MODIF ID ‘MOD’ is used to access the parameter ‘inputbox’ in the selection screen.


Output when enabler is selected


Output when disabler is selected. You can’t enter any values in the inputbox.


Adding TABSTRIP in ABAP Selection Screen - SAP


How to add Tabstrips in Selection Screen using ABAP programming?

SAP ABAP Programming


Define a selection screen 100 as the subscreen. Within the subscreen, define a parameter according to your requirement.


Define a selection screen 101 as the subscreen. Within the subscreen, define a parameter according to your requirement.


Now assign the Tabs to the subscreen 100 and 101.


Name the Tabstrips as per your requirement.


Press F8 to execute the program and you will see the result as below.